Add/Edit Custom Lists
All custom lists in symplr Performance can be edited to meet individual customer needs. Though the process for adding and editing lists is similar across all lists, there are slight differences in some instances.
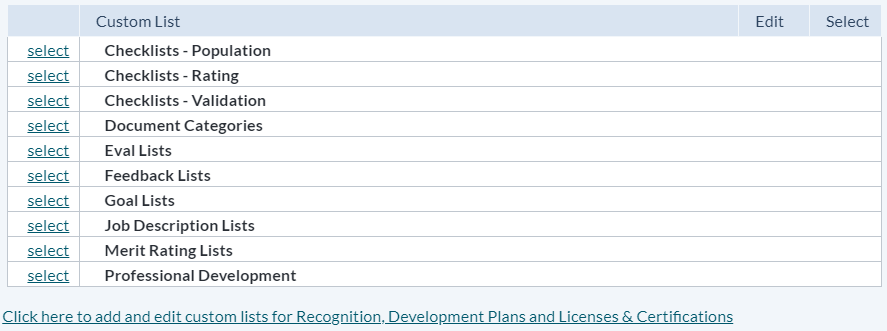
There are two pages where custom lists are managed: the main Custom Lists page, and another Lists page that's reachable by clicking the link under the table on the main Custom Lists page.
The table on the main Custom Lists page contains several lists for various features throughout symplr Performance. While overall management is similar, some of these lists contain slight differences regarding what information is displayed.
Multiple Competency Population lists can be added to the system. These can be edited at any time.
To set up a new Competency Population list:
- Click the Select link next to the Competency Population listing on the Custom Lists page.
- Enter the title of the list in the available text box (example: Facility wide Population Served) and click the Add link. This adds the new list to the table.
- Click the Edit link next to the new listing.
-
Enter the Value and Description.
Note: The Description field is viewable by system administrators only; it is not viewable anywhere else in the system. Only the Value is displayed to users.
- Click Add.
Clicking the Add link adds the item to the list. Repeat steps 4 and 5 to add more items to the list.
Other actions
- Items can be removed by selecting the checkbox next to the item and clicking Remove Selected.
- Click the Cancel button to go back to the previous page. Any edits made are saved.
- Click the Edit link next to the item to modify or change the text.
Multiple Competency Rating lists can be added to the system. These can be edited at any time.
To set up a new Competency Rating list:
- Click the Select link next to the Competency Rating listing on the Custom Lists page.
- Enter the title of the list in the available text box (example: Facility wide Rating) and click the Add link. This adds the new list to the table.
- Click the Edit link next to the new listing.
-
Enter the Value and Description.
Note: The Description field is viewable by system administrators only; it is not viewable anywhere else in the system. Only the Value is displayed to users.
- Click Add.
Clicking the Add link adds the item to the list. Repeat steps 4 and 5 to add more items to the list.
Other actions
- Items can be removed by selecting the checkbox next to the item and clicking Remove Selected.
- Click the Cancel button to go back to the previous page. Any edits made are saved.
- Click the Edit link next to the item to modify or change the text.
Multiple Competency Validation lists can be added to the system. These can be edited at any time.
To set up a new Competency Validation list:
- Click the Select link next to the Competency Validation listing on the Custom Lists page.
- Enter the title of the list in the available text box (example: Facility wide Validation) and click the Add link. This adds the new list to the table.
- Click the Edit link next to the new listing.
-
Enter the Value and Description.
Note: The Description field is viewable by system administrators only; it is not viewable anywhere else in the system. Only the Value is displayed to users.
- Click Add.
Clicking the Add link adds the item to the list. Repeat steps 4 and 5 to add more items to the list.
Other actions
- Items can be removed by selecting the checkbox next to the item and clicking Remove Selected.
- Click the Cancel button to go back to the previous page. Any edits made are saved.
- Click the Edit link next to the item to modify or change the text.
Though only one Document Category list can be used in symplr Performance, it can contain as many values as necessary. These can be edited at any time.
To set up a document categories list:
- Click the Edit link next to the Document Category List item under the Document Categories item on the Custom Lists page.
-
Enter the Value and Description.
Note: The Description field is viewable by system administrators only; it is not viewable anywhere else in the system. Only the Value is displayed to users.
- Click Add.
Clicking the Add link adds the item to the list. Repeat steps 2 and 3 to add more items to the list.
Other actions
- Items can be removed by selecting the checkbox next to the item and clicking Remove Selected.
- Click the Cancel button to go back to the previous page. Any edits made are saved.
- Click the Edit link next to the item to modify or change the text.
Multiple Eval lists can be added to the system. These can be edited at any time.
To set up a new Eval list:
- Click the Select link next to the Eval Lists listing on the Custom Lists page.
- Enter the title of the list in the available text box (example: Job Duties Rating Scale) and click the Add link. This adds the new list to the table.
- Click the Edit link next to the new listing.
-
Enter the Value and Description.
Note: The Description field is viewable by system administrators only; it is not viewable anywhere else in the system. Only the Value is displayed to users.
- Check the Required option if comments are mandatory for that rating.
-
Enter a Score for the rating.
Note: For ratings of "Not Applicable" or "N/A", the Score should be set to null value. Do not use zero for a null value.
- Click Add.
Clicking the Add link adds the item to the list. Repeat steps 4 through 7 to add more items to the list.
Other actions
- Items can be removed by selecting the checkbox next to the item and clicking Remove Selected.
- Click the Cancel button to go back to the previous page. Any edits made are saved.
- Click the Edit link next to the item to modify or change the text.
Users do not have the ability to add new Feedback lists to symplr Performance. However, it is possible to edit values that appear in the existing Feedback lists.
Each Feedback list is edited in the same manner as follows:
- Click the Select link next to the Feedback Lists listing on the Custom Lists page.
- Click the Edit link next to the list you wish to edit.
- Enter the Value and Description.
- Click Add.
Clicking the Add link adds the item to the list. Repeat steps 3 and 4 to add more items to the list.
Other actions
- Items can be removed by selecting the checkbox next to the item and clicking Remove Selected.
- Click the Cancel button to go back to the previous page. Any edits made are saved.
- Click the Edit link next to the item to modify or change the text.
Feedback List Notes
The notes below detail recommendations for several of the existing Feedback lists when performing edits on their contents.
The Description field should be a customized suggestion text that appears for each title. Each title can have multiple suggestion texts associated.
Only the Description is viewed on the Feedback form. The value does not appear to users.
The only acceptable entries for the Value field are:
- Positive
- Coaching
- Corrective
The Description field should be the customized disclaimer that appears for each feedback type. There can only be one disclaimer per type.
Only the Description is viewed on the Feedback form. The Value does not appear to users.
The Value field is pre-filled for Feedback Instructional Text items. The displayed values are the only values accepted.
The Description field should be the customized instructional text that appears for each feedback type. There can only be one instruction per type.
Only the Description is viewed on the Feedback form. The Value does not appear to users.
Users do not have the ability to add new Goal lists to symplr Performance. However, it is possible to edit values that appear in the existing Goal lists.
Each Goal list is edited in the same manner as follows:
- Click the Select link next to the Goal Lists listing on the Custom Lists page.
- Click the Edit link next to the list you wish to edit.
- Enter the Value and Description.
- Click Add.
Clicking the Add link adds the item to the list. Repeat steps 3 and 4 to add more items to the list.
Other actions
- Items can be removed by selecting the checkbox next to the item and clicking Remove Selected.
- Click the Cancel button to go back to the previous page. Any edits made are saved.
- Click the Edit link next to the item to modify or change the text.
Goal Instructional Text Notes
The Value field is pre-filled for Goal Instructional Text items. The displayed values are the only values accepted.
The Description field should be the customized instructional text that appears for the employee or manager on the goal form. There can only be one instruction per type.
Only the Description is viewed on the Feedback form. The Value does not appear to users.
Multiple Job Description lists can be added to the system. These can be edited at any time.
To set up a Job Description list:
- Click the Select link next to the Job Description listing on the Custom Lists page.
- Enter the title of the list in the available text box (example: Education) and click the Add link. This adds the new list to the table.
- Click the Edit link next to the new listing.
-
Enter the Value and Description.
Note: The Description field is viewable by system administrators only; it is not viewable anywhere else in the system. Only the Value is displayed to users.
- Click Add.
Clicking the Add link adds the item to the list. Repeat steps 4 and 5 to add more items to the list.
Other actions
- Items can be removed by selecting the checkbox next to the item and clicking Remove Selected.
- Click the Cancel button to go back to the previous page. Any edits made are saved.
- Click the Edit link next to the item to modify or change the text.
One Merit Rating list can be added for each template in the system provided the template is not inherited.
Merit rating lists are usually set up by your Account Manager during implementation. It is recommended that you reach out to your Account Manager for assistance when working with merit rating lists.
To set up a new Merit Rating list:
- Click the Select link next to the Merit Rating listing on the Custom Lists page.
- Enter the title of the list in the available text box (example: RN Increases) and click the Add link. This adds the new list to the table.
- Click the Edit link next to the new listing.
- Enter a Value. This will be the actual increase amount or overall score (example: 4% increase or Exceptional).
- Enter a Description. This will be the highest score/weighted average possible to achieve that value (example: score of up to 100 points or 5.00 weighted average).
- Click Add.
Clicking the Add link adds the item to the list. Repeat steps 4 through 6 to add more items to the list.
Other actions
- Items can be removed by selecting the checkbox next to the item and clicking Remove Selected.
- Click the Cancel button to go back to the previous page. Any edits made are saved.
- Click the Edit link next to the item to modify or change the text.
Only one Professional Development list is allowed in symplr Performance, but it may contain as many list items as needed. These items can be edited at any time.
To add items to the Professional Development list:
- Click the Select link next to the Competency Validation listing on the Custom Lists page.
- Click the Edit link next to the Professional Development Type listing.
-
Enter the Value and Description.
Note: The Description field is viewable by system administrators only; it is not viewable anywhere else in the system. Only the Value is displayed to users.
- Click Add.
Clicking the Add link adds the item to the list. Repeat steps 3 and 4 to add more items to the list.
Other actions
- Items can be removed by selecting the checkbox next to the item and clicking Remove Selected.
- Click the Cancel button to go back to the previous page. Any edits made are saved.
- Click the Edit link next to the item to modify or change the text.
Clicking the link under the table on the main Custom Lists page opens the new Custom Lists for Recognition, Development, and Licenses & Certifications page. The main headings on the page display the features that use customizable lists, and clicking on each heading expands its area to display the lists that can be customized for that feature.
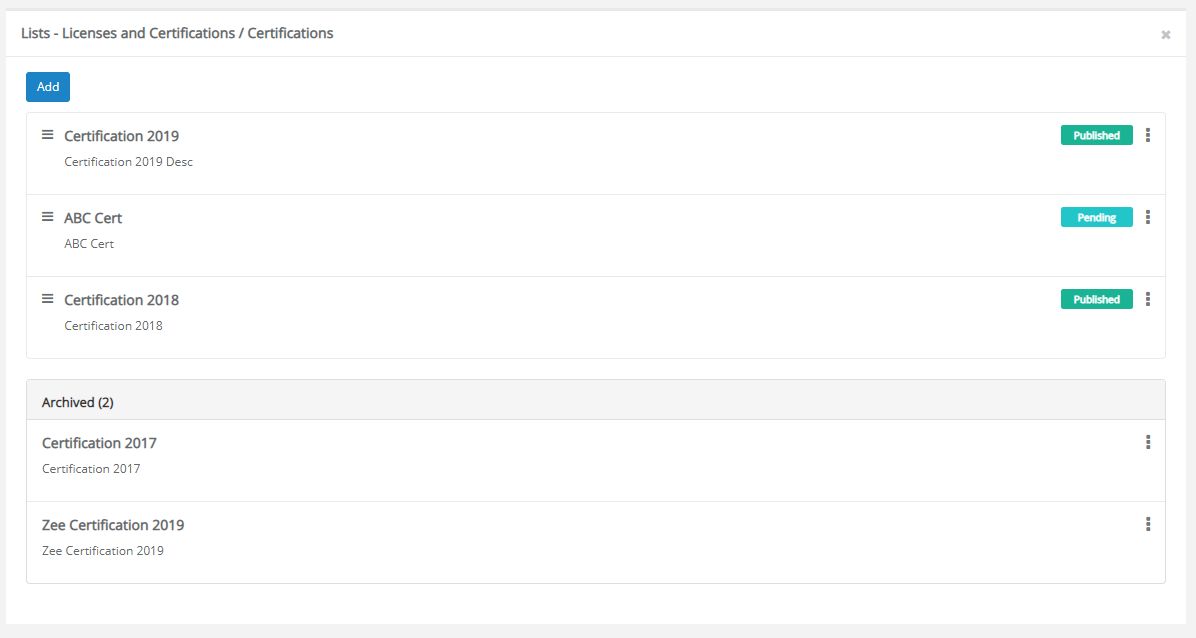
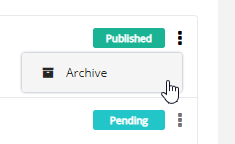
Clicking a list name under a heading displays its list management page. These pages display any existing items, in both Published and Pending status, that have been added to the list.
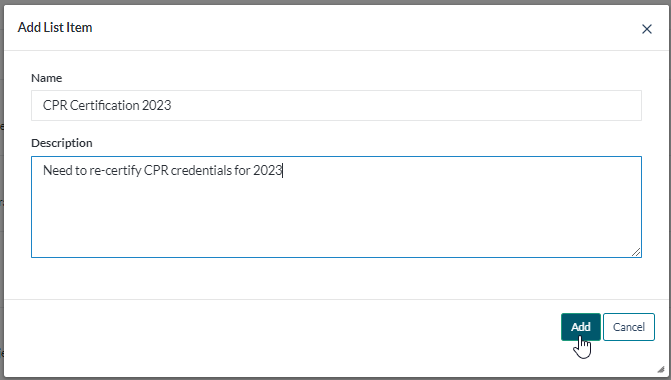
Clicking Add at the top of the page displays an Add New Item modal window. Enter a name for your item, and give it an appropriate description. When you're satisfied with the item, clicking Add in the modal adds the item to the list one the page, with a status of Pending. The status must be changed to Published if you want the item to appear for other users.
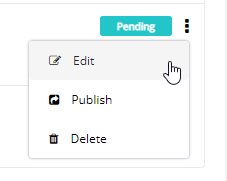
When an item has a Pending status, there are three actions available to perform on it when selecting its context menu (the three vertical dots): Edit, Publish, and Delete.
- Edit. Re-opens the Add New Item modal, where you can make changes to the title and description. Clicking Add re-adds it to the list, and Cancel scraps your changes.
- Publish. Changes the item's status to Published, enabling other users to see this item on their list.
- Delete. Permanently removes the item from the list.
