Reference Assessment Online Help
symlpr Reference Assessment is a tool designed to make checking your references as quick and convenient as possible for everyone involved. Using this online process enables you to easily solicit a reference from a colleague or previous supervisor. Your reference is free to take the time they need to provide your feedback.
Invitees are presented with a continuous, linear workflow that can be completed in minutes. Verify some information, share a few bits of feedback, then complete a quick survey to wrap up the process. After submitting your answers and receiving confirmation, simply close the window and carry on with the rest of your day.
Additional information about each step in the process is found within the drop-down menus below.
If you’ve been invited to set up an account in Reference Manager, it means you’re in the running for a position. Congratulations! However, since time is of the essence, we’re keeping things as straightforward as possible so you can log in, add your references, and get that feedback sent to your prospective employer, post haste.
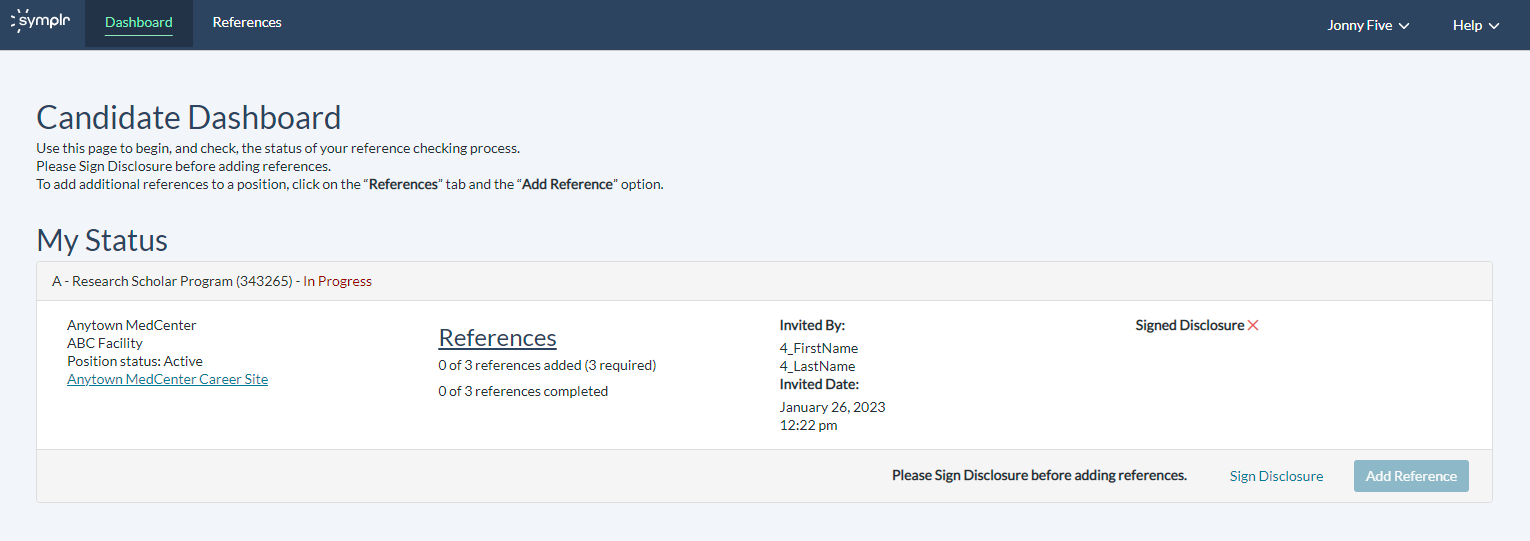
Before you can begin adding references, you must first complete and e-sign a disclosure form. To do this, click Sign Disclosure on your dashboard page, then complete each step one by one. Upon completion, your Dashboard page displays again and the Add Reference button will be clickable.
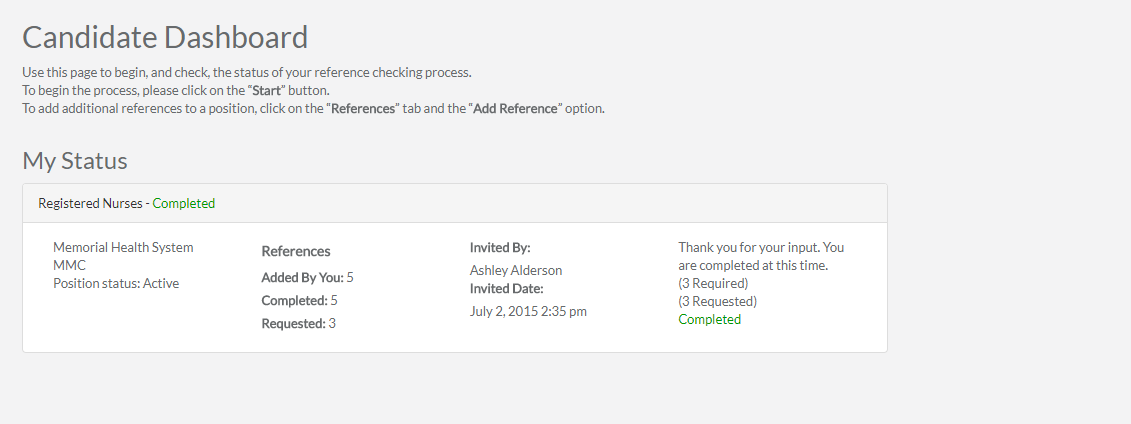
The Candidate Dashboard page is displays your status upon logging into the Reference Assessment system. It shows a listing of any active jobs, how many references are needed to satisfy the requirements of each one, and each job's reference completion status. If a job's reference requirements have been met, it will display as Completed.
Every job also contains a count of any references added by you, the amount of references who have completed their assessment, and the total number of reference assessments requested. The name of the person who invited you to the Reference Assessment also displays, along with the date they sent the invitation.
The Start button displays alongside a position whenever you need to add more references. Clicking this displays the Add a Reference page. To learn more about this page, please refer to the Adding References section below.
Additionally, clicking References at the top of the page displays the My References page. For more details about this page, please refer to the My References section below.
Career Site. Underneath a job’s details on the My Status page, there may be a link to the employer’s web site. Clicking this opens the site in the current window/tab, so if you wish to look at their web site while staying on this page, you must right-click the link and select Open link in new tab or Open link in new window (options may vary by browser).
Note: If you’re using a Mac, you can hold the Shift or CTRL key while clicking the link to achieve the same effect.
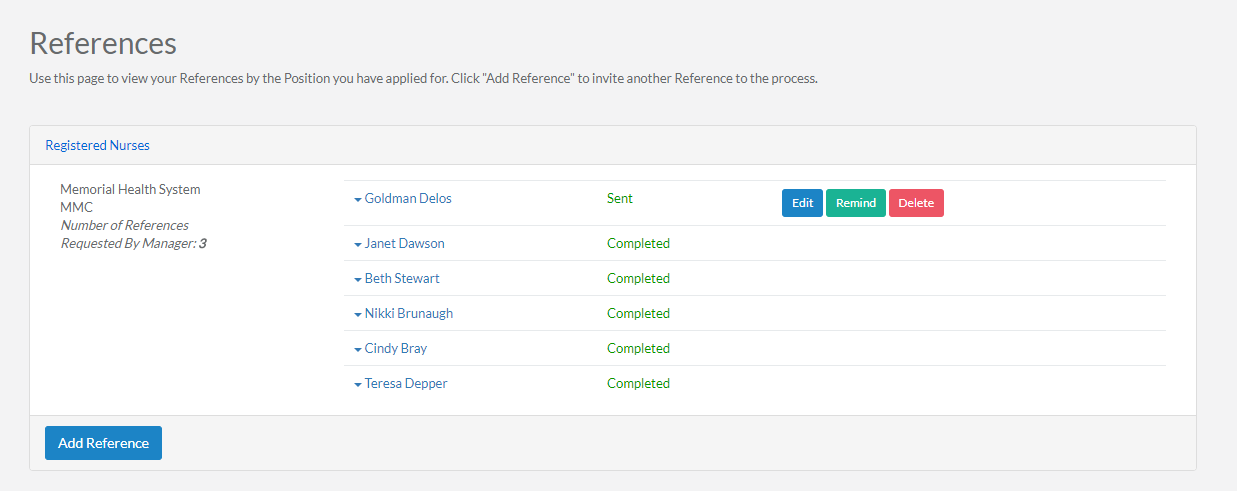
The My References page lists your references, grouped together by each position you have applied for. Any positions applied to display in the left-hand side of the page, while the references you have reached out to are listed to the right.
Clicking the Add Reference button displays the Add Reference page, where adding your references takes place. For more information on how to complete this process, please refer to the Adding References section.
Adding a reference is done by clicking the Add Reference button on the My References page. Alternately, the Add Reference link underneath the References tab displays the same page.
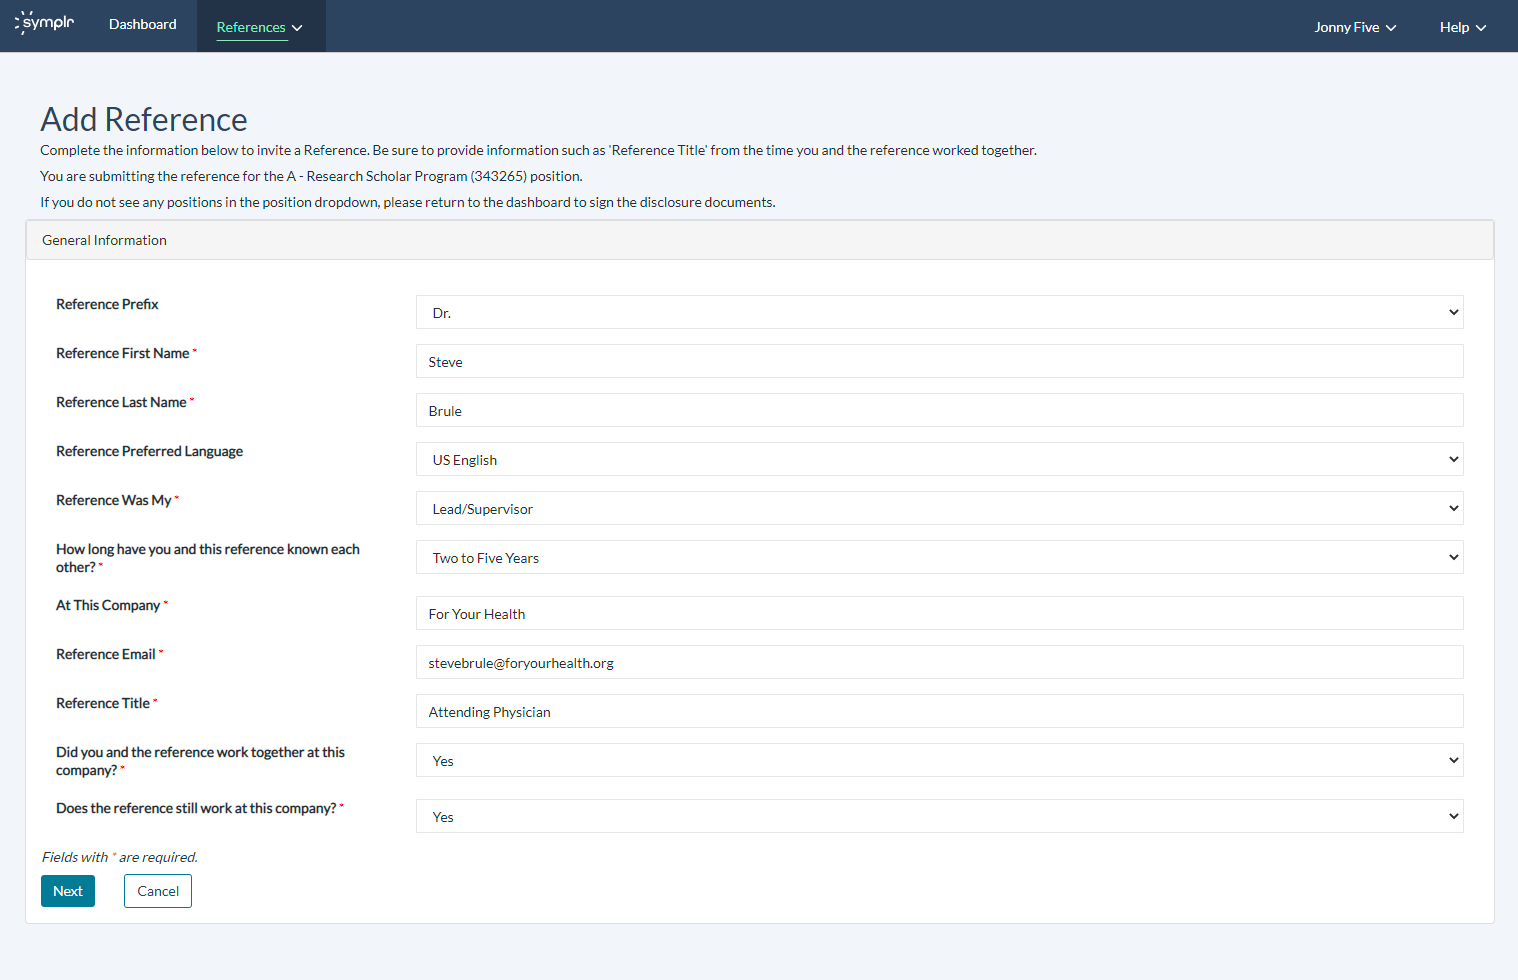
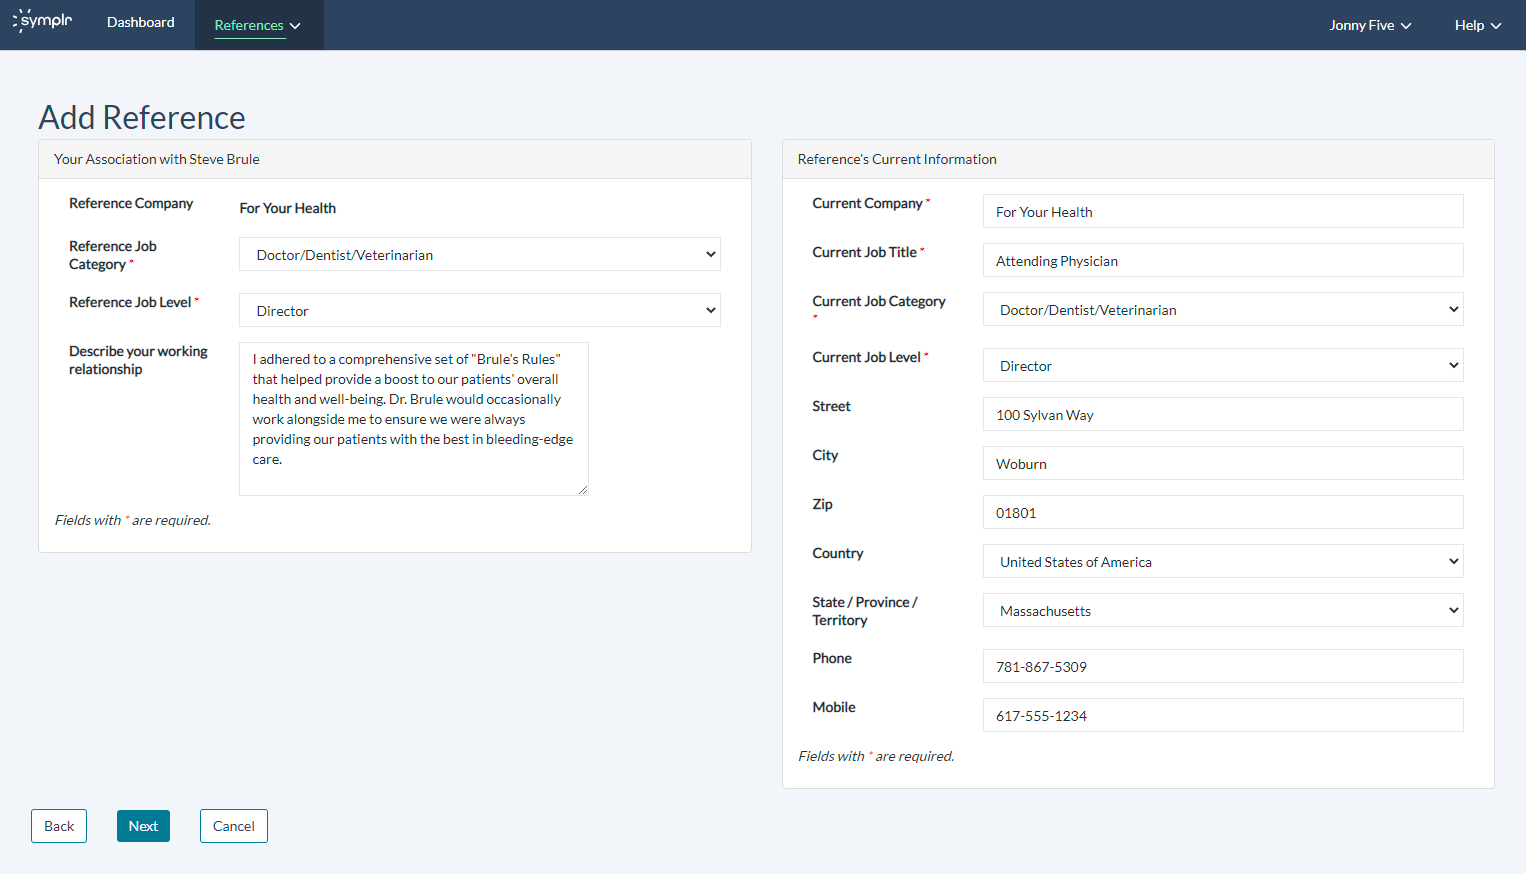
Once on the Add Reference page, complete the form by entering all the required information, then clicking Next to proceed to the next segment. There are three pages that need to be completed before the reference request is finally sent.
The first page consists of a form seeking general information. Name, the Reference’s relation to you at your previous job, length of time known, and other associated details. If a field has an orange question mark icon next to it, you may hover your cursor over it to learn additional details about the information sought.
The second page contains two more sections. The first section is requesting more details about your reference’s role at your previous company, and seeks a summary of how the two of you typically worked with one another.
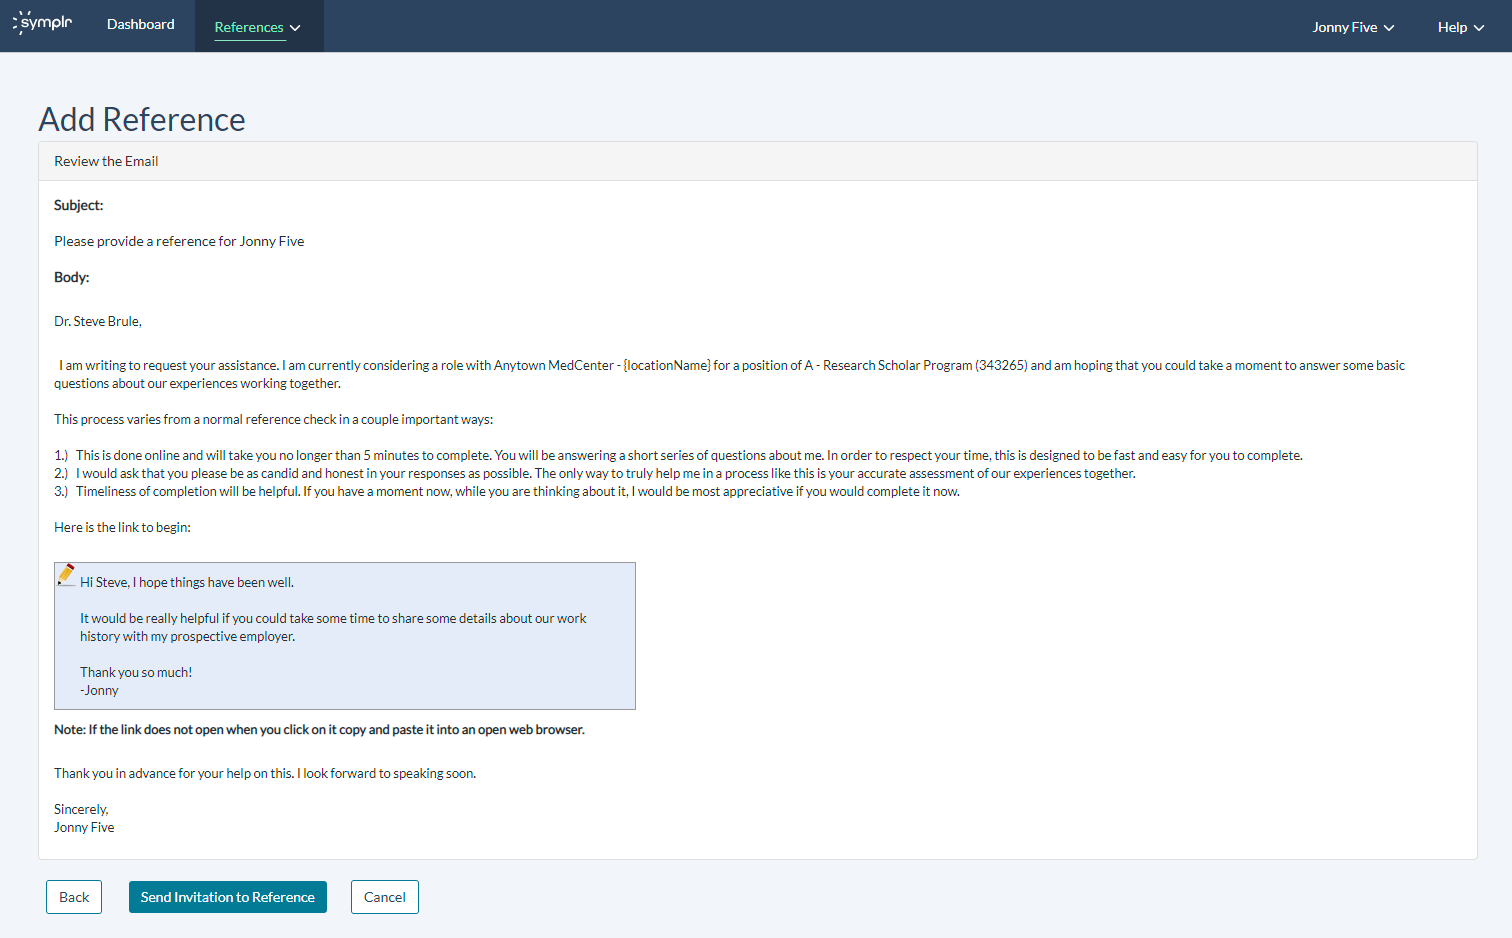
The third page is dedicated to the email soliciting the reference for their feedback. Adding a personal note to the pre-written email template is done by clicking the blue box with the pencil icon. After clicking the box, a text field appears. Type out the message you wish to include in this field, then click Save to add this customized note to the body of the email. When you’re finished, clicking the Send Invitation to Reference button sends this message to the reference’s email.
Upon sending your request, the My References page displays. The name of the reference you just added now shows, along with the status of their referral. When references are added, they are listed in the right-hand side of the page. References always display one of the following statuses, depending on their level of completion:
• Sent. Invitation has been sent to the reference’s email address.
• Undeliverable. Invitation email has been bounced back by the email address provided. In these cases you’ll want to double-check the email address you entered to verify its accuracy.
• Started. Reference has received the assessment invitation and has begun working to complete it.
• Completed. Reference has completed the reference assessment and sent it to the organization.
Next to the status are three action buttons for conducting various actions on the individual reference. If any actions are unavailable, they appear grayed out.
These options include:
-
Edit. Displays the Edit Reference page, where you may edit their contact information, your description of your working relationship, and other associated details.
-
Remind. Clicking this link (and clicking OK in the confirmation pop-up that displays) automatically sends the reference an email reminder to complete their reference assessment.
-
Delete. Deletes the reference from your list of references.
Note: If the reference's status has changed to Started, the Edit and Delete options are rendered unavailable. However, the reference may still edit their own details after logging in.
To edit a reference, click the Edit button. If the reference's status has changed to Started, the option is no longer available to you.
Once your reference starts to fill out the questionnaire, you are no longer able to edit or delete the reference. If there are errors, the reference may edit on their end.
The email that you sent is an automated message that may be mistaken for spam by the reference’s email security settings. Have your reference check their spam/junk mail folder. You can resend the email to your reference by clicking Remind.
The system does require a valid, unique email address for each reference. Do not input fake email addresses for references. You can login at any time to add an email address.
This field refers to the company that you and the reference worked at together. If you have not worked with the reference, please enter their current place of employment or N/A (Not Applicable).
For assistance from symlpr about a topic not covered here, please contact us at: talentsupport@symplr.com.
Thank You!
