Hiring an Applicant
These steps are taken from the Applicant Detail page.
Note: Depending on available permissions for a user and overall system settings, not all of the steps shown here may be available.
To get started, select Hire Applicant from the Take Action drop-down menu. The new hire wizard launches and displays the first step of the process, New Hire Information.
-
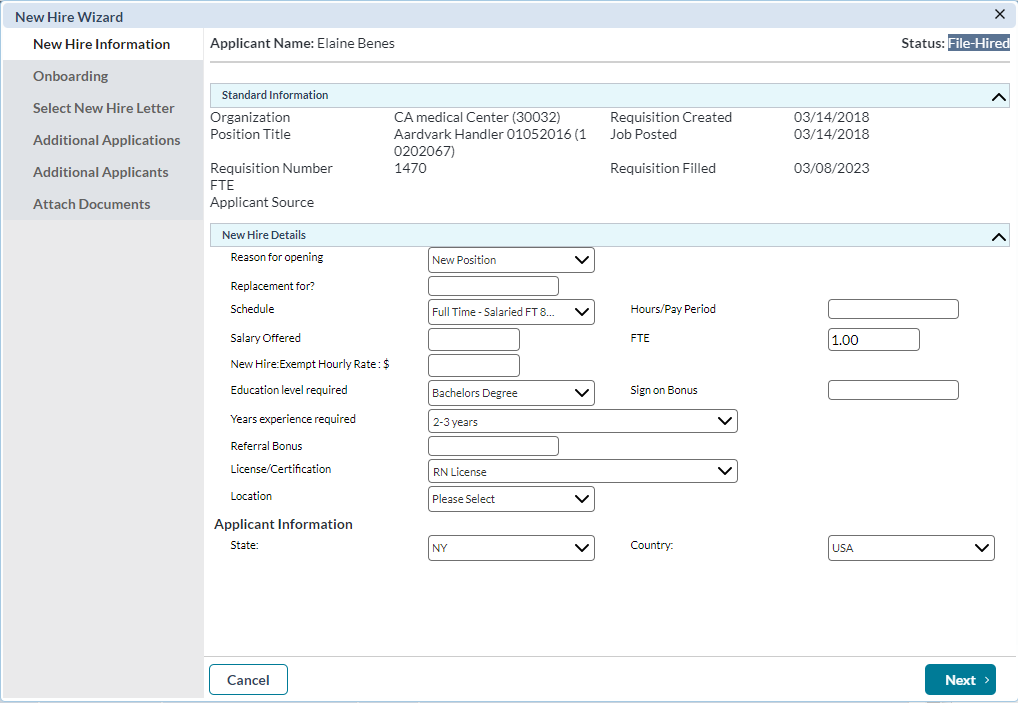
New Hire Information. The first step of the process involves completing the New Hire form for the hired applicant. Though these forms are customizable, they usually contain compensation information for the new hire (referral, signing bonuses, etc.).
 New Hire Information details
-
Complete all the necessary fields on the new hire form.
Note: New hire forms are customizable, so the list of available fields in this section will vary from client to client. These fields are set based on the data your organization requires for new hires.
- Click Next to advance to the next step of the new hire wizard.
-
-
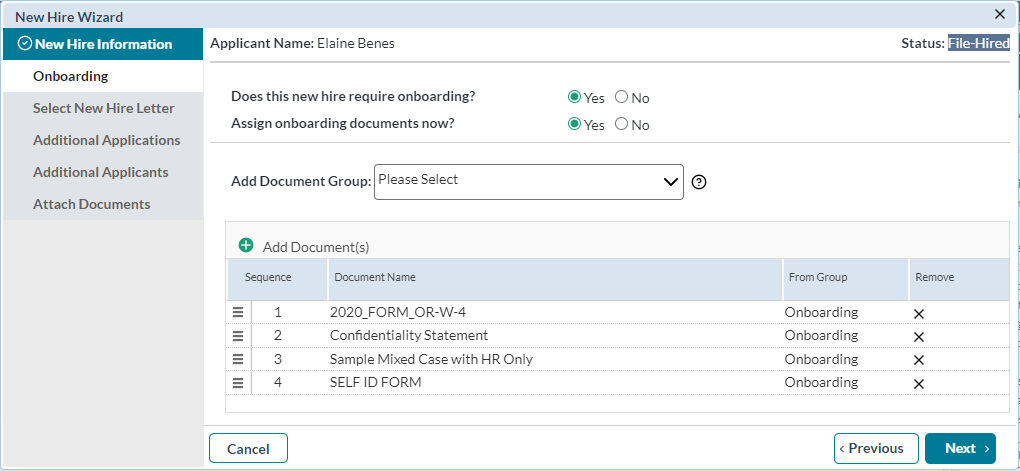
Onboarding. This step, available only if your system is configured to use onboarding, allows you to assign documents to the selected applicant. These documents can be forms that need to be completed by the applicant, or simple informational documents, such as benefits explanations.
 Onboarding details
- Select if the new hire requires onboarding. If No is selected, all remaining options for the onboarding step are removed and you can advance to the next step in the wizard.
- Select if you wish to assign onboarding documents at this time. If No is selected, all remaining options for the onboarding step are removed and you can advance to the next step in the wizard.
-
Select a group of documents to assign to the applicant from the Document Group drop-down menu. This populates the document table with the documents in the selected group.
Note: You can remove any single document from the table by clicking the X under the Remove column.
- To add an additional document to the applicant that is not part of a document group, click the Add Document button and select from the available list of documents.
- If necessary, you can change the order in which the list of documents displays to the applicant by clicking in the far-left column of each item to drag-and-drop the documents into the desired order.
- Clicking Next advances to the next step of the new hire wizard.
-
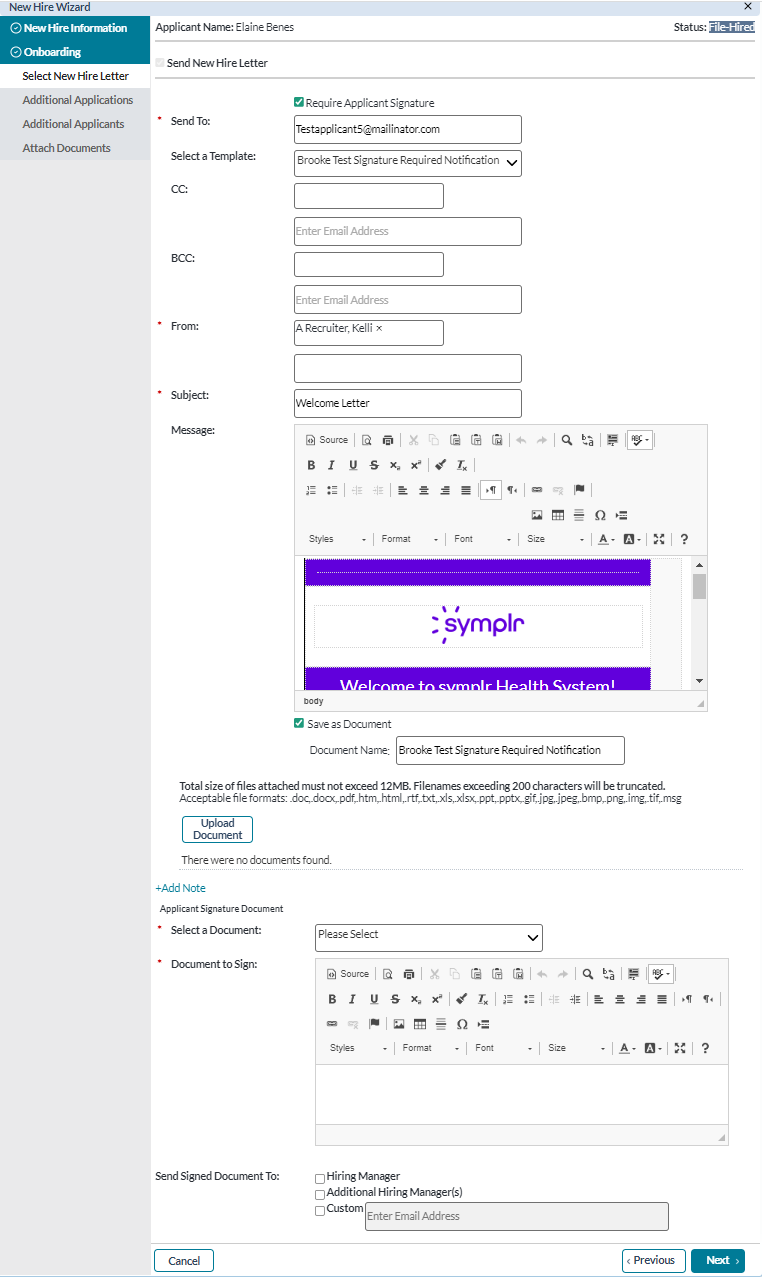
Select New Hire Letter. This step allows you to send a confirmation letter to the new hire. The letter is based off an existing communication template in the system, but can be edited as necessary before sending. Though this step always appears in the wizard, it is not necessary to send a letter to the applicant at this time.
 Select New Hire details
-
Choose an option from the Select a Template drop-down list. The Subject and Message fields pre-populate based on the selected template.
Note: It is not necessary to select a template to send a letter. You can manually enter a Subject and Message.
- In the CC and BCC fields, select a user with the user lookup, or type in an email address for additional recipients.
- Select users with the user lookup for the From field. This field defaults to the current user, so edits may not be necessary.
- Edit the Subject as necessary.
- Edit the Message of the email as necessary.
- Select Save as Document if you wish to save the email as a document in the applicant records. If this option is selected, you must enter a Document Name in the available text field.
- If you wish to email a copy of an e-signed document to hiring managers and additional hiring managers when a candidate has completed their eSignature document, add the recipients in the Send Signed Document To area by entering their email addresses.
- If you wish to include additional documents in this message, select Upload Document to attach any supplemental documentation.
- Click Add Note if you wish to add Global and/or Internal notes on the applicant.
- Check the boxes as needed to Send Signed Document To the hiring manager, any additional hiring manager(s), or anyone else by entering their email address in the Custom field.
- Click Next to advance to the next step of the new hire wizard.
-
-
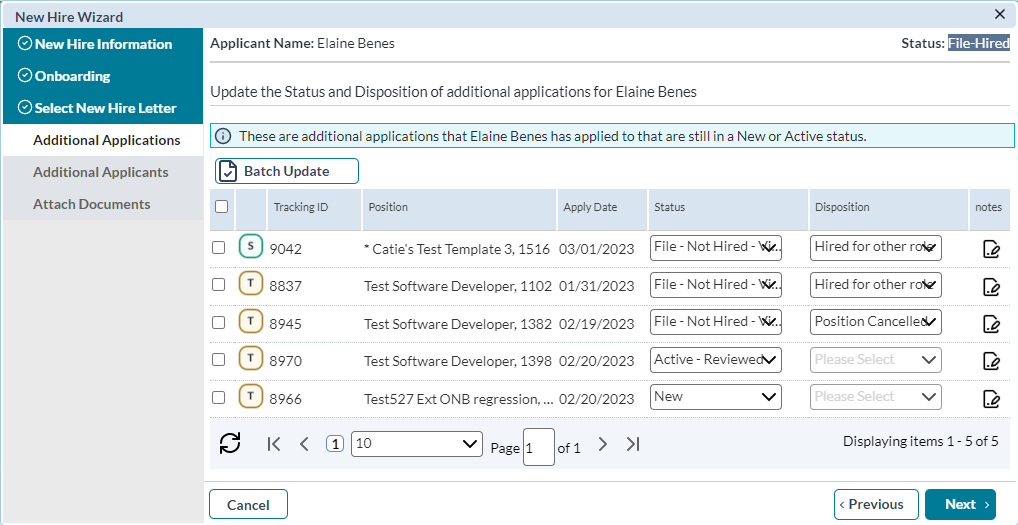
Additional Applications. If the new hire has additional applications in the system for other open positions, this step allows you to update the status and disposition of those applications.
 Additional Applications details
- Select the check boxes next to the applications you wish to update.
- Select a new Status from the available drop-down list for each application you wish to update.
-
Select a Disposition from the available drop-down list for each application you wish to update.
Note: Collecting a disposition is an option based on site settings. This field may not appear in your system, or it might be a required field when updating the status of an application.
- If necessary, click the icon under Notes to add Global and/or Internal notes for the application.
- When finished updating the available applications, click Batch Update.
- Click Next to advance to the next step of the new hire wizard.
-
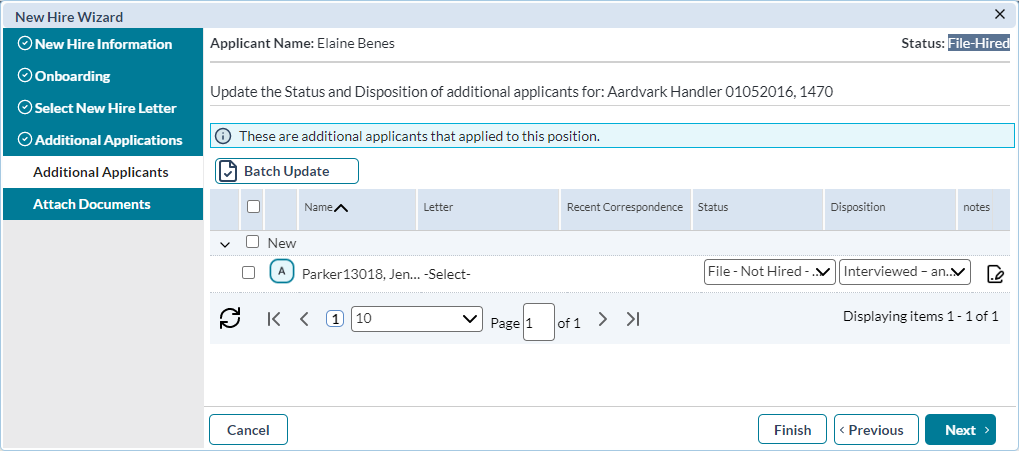
Additional Applicants. Similar to the previous step, the final step in the new hire wizard allows you to batch process any additional applicants to the requisition you are hiring for.
 Additional Applicants details
- Select the check boxes next to the applicants you wish to update.
- Click Select if you wish to send a letter to the applicant. This opens a pop-up window with letter selection options similar to those found with the Batch Action option.
- Select a new Status from the available drop-down list for each applicant you wish to update.
-
Select a Disposition from the available drop-down list for each applicant you wish to update.
Note: Collecting a disposition is an option based on site settings. This field may not appear in your system, or it might be a required field when updating the status of an application.
- If necessary, click the icon under Notes to add Global and/or Internal notes for the application.
- Click Next.
Tip: Rejection letters can be send in batch using the Batch Action option.
-
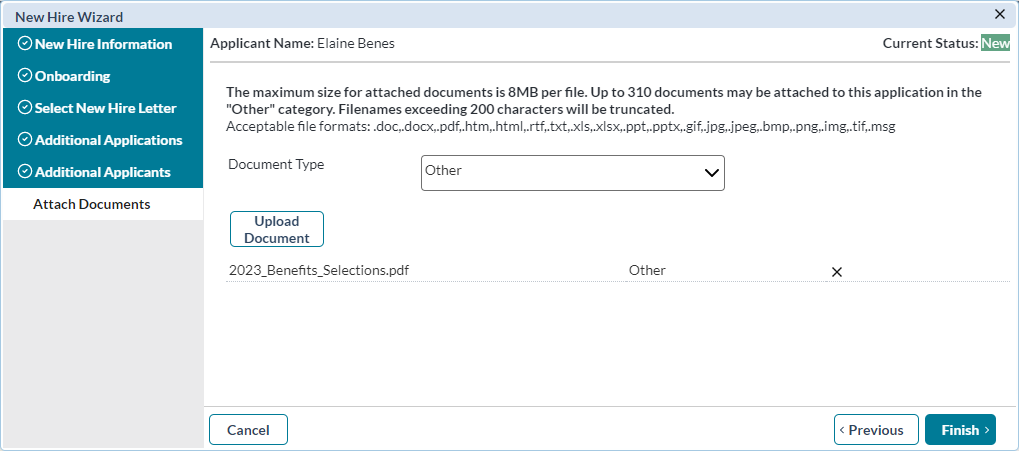
Attach Documents. This step allows you to add a reference document to the hired applicant's profile. This includes templates from the system or uploaded documents.
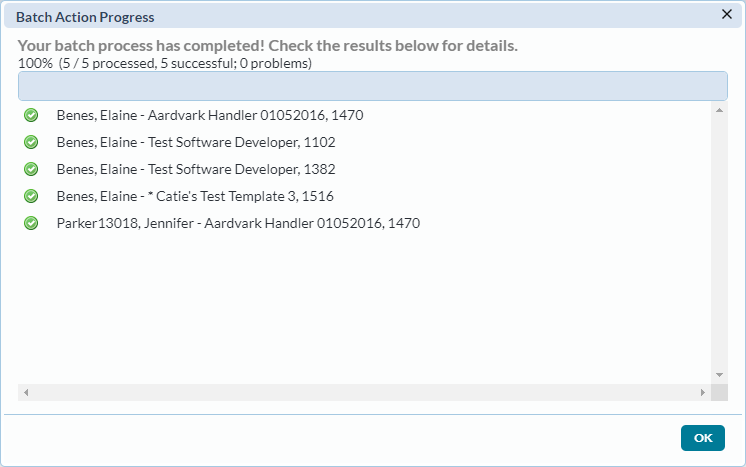
Clicking Finish completes the hiring process. If any batch actions were taken against additional applications and/or applicants, a modal window displays the progress of these batch actions.
Once the batch actions have completed, closing the window displays the Applicant Detail page, where the status has been updated.
Several other actions occur upon completing the hiring process:
- The New Hire tab on the Applicant Detail page activates.
- The History tab displays the changes to the current and any additional applications for the applicant.
- The status of the associated requisition changes from Active to Filled.
- The associated job posting is removed from all career sites.
Note: Once an applicant moves to a status of File - Hired, you cannot update their status using the usual methods (Change Status, Send to Manager, etc.). You must use the Unhire Applicant action to make any changes to the applicant status.
