Creating a Requisition
Before a new job can be posted for applicants, it must first be entered into symplr Recruiting as a requisition.
There are two ways to create a new requisition in symplr Recruiting: start from scratch, or copy an existing requisition. This topic covers the process for creating a new requisition from scratch.
You can view instructions for copying an existing requisition here.
symplr Recruiting provides an easy-to-use wizard that walks you through the requisition creation process.
To get started, click the Add Requisition button on the main Requisitions page. The requisition creation wizard launches and displays the first step of the process, Select Organization.
Note: Depending on available permissions for a user and overall system settings, not all of the steps shown here may be available.
-
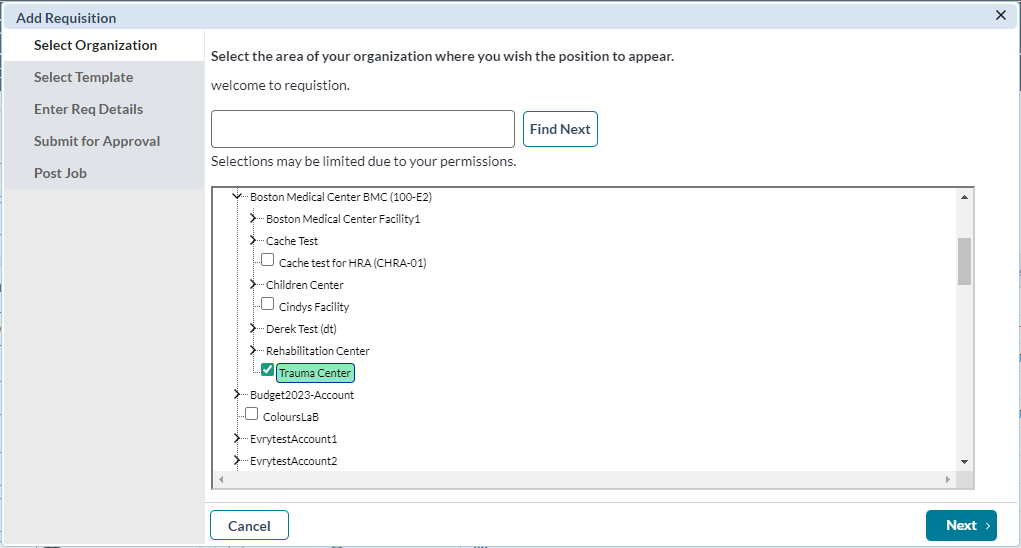
Select Organization. In this step, you select the specific area of your organizational structure where the opening resides. Your selection here determines which job templates are available in the next step.
 Select Organization details
-
Check the box next to the entity in your organizational hierarchy for the new requisition. You can either browse the tree structure or perform a search by entering part of an Organization Name or Code into the text field and clicking the Find button.
Note: The system checks an organization for you by default, but you can change the selection as needed. The default selection is based on the position in hierarchy noted in your user profile; or, if you are a recruiter, the areas of responsibility in your profile.
- Click Next to advance to the next step of the process.
-
-
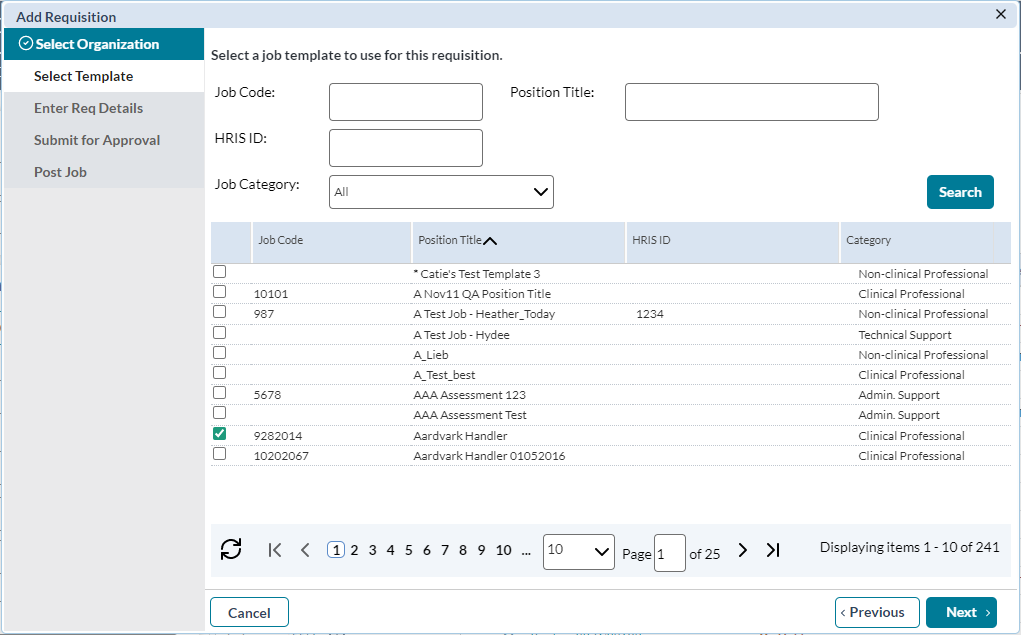
Select Template. This determines the specific job for your opening. The template you select here will pre-populate the Requisition Detail form in the next step.
 Select Template details
-
Check the box next to the job template you wish to use for the new requisition. You can either browse the list of available templates or perform a search by entering a Job Code or Position Title into the text fields and clicking the Search button.
Note: If there are no job templates available to select, you do not have the necessary permissions to create a requisition in the selected area of your organization. You can return to the previous step and select a different organization, or contact your system administrator to verify your permissions.
- Click Next to advance to the next step of the process.
-
-
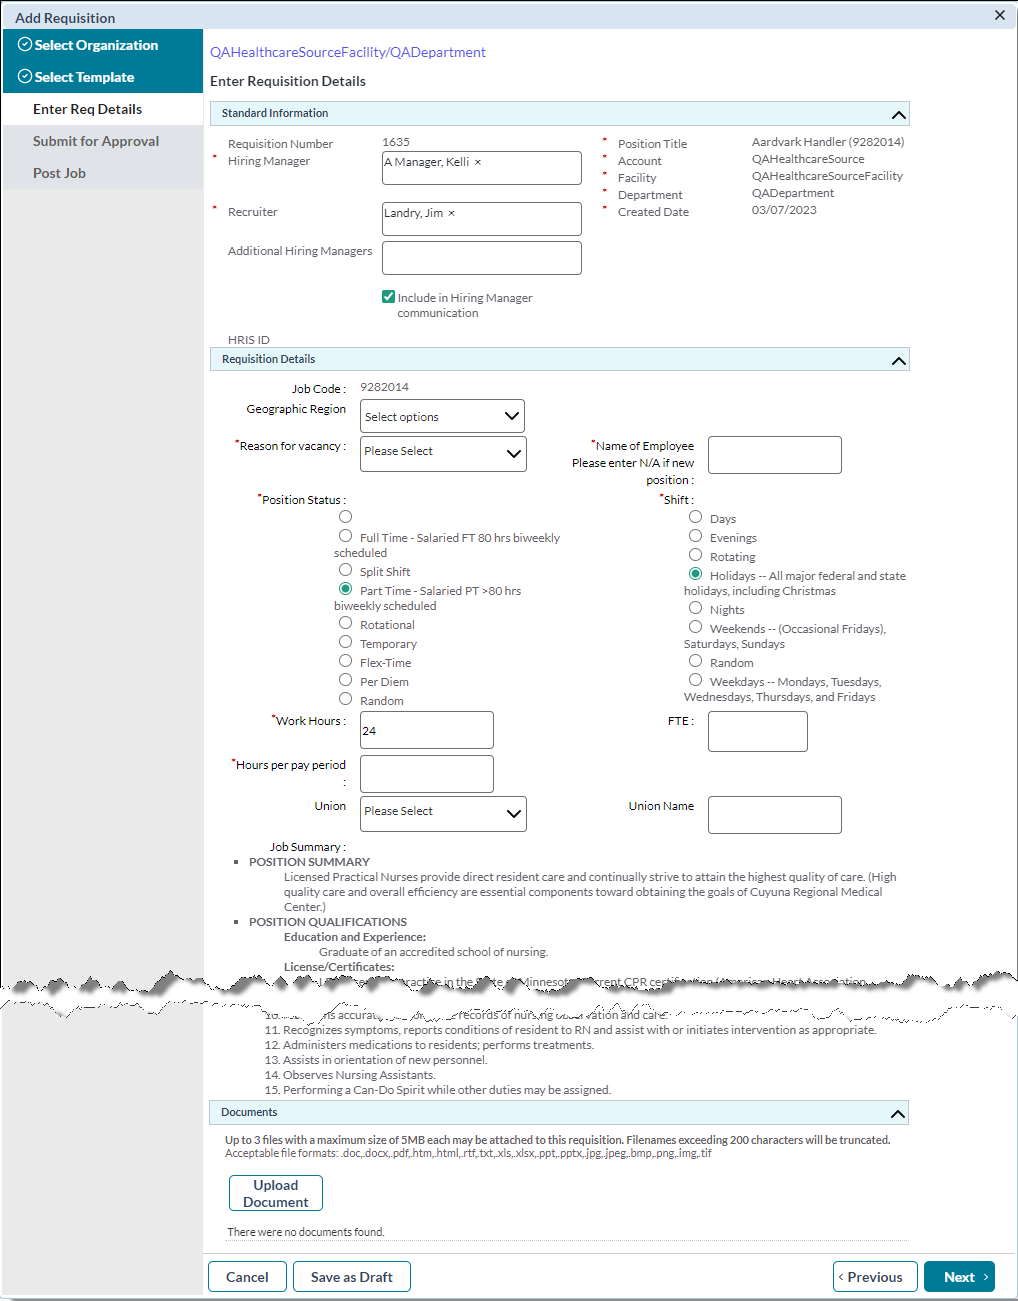
Enter Req Details. This is where the details of the opening are entered. These forms are customizable and will vary from client to client.
 Enter Req Details details
In the Standard Information section:
-
Type in a Requisition Number.
Note: The Requisition Number field may appear as a read-only field. This occurs when your symplr Recruiting system is set up to automatically generate this number.
-
Select a Hiring Manager.
Note: This field may be filled in by default depending on your system settings.
Multiple Hiring Managers can be added to a requisition.
- Click the Search icon next to the Hiring Manager field.
- From the User Lookup pop-up window, select the check box next to the name you want to assign to the Hiring Manager role for the requisition.
- Click the OK button.
-
Select a Recruiter.
Note: This field may be filled in by default.
- Click the Search icon next to the Recruiter field.
- From the User Lookup pop-up window, select the check box next to the name you want to assign to the Recruiter role for the requisition.
- Click the OK button.
-
Enter any Additional Hiring Managers you wish to include in the hiring process.
Note: For more details on adding additional hiring managers, check out our feature overview guide.
In the Requisition Details section:
-
Enter data into the available fields in this section.
Note: Requisition forms are customizable, so the list of available fields in this section will vary from client to client. These fields are set based on the data your organization requires for requisition requests.
In the Documents section:
-
Click the Attach Documents button. This allows you to browse your computer and upload a reference file to the new requisition.
Note: Your Requisition Details form may not include a Documents section. This is an option and is not automatically included in all symplr Recruiting systems.
Once you have completed the Requisition Details form, you have several options as to how to proceed. Your system settings determine which buttons are available and what each does.
 Button options
-
Next. If you have a Next button, clicking this takes you to the next step in the process. At this point, a requisition record is created in the system and given a status of “Draft”.
-
Finish. If you see a Finish button, clicking this completes your portion of the requisition process. The new requisition is created and set to a status of “Active”. The requisition is sent to the user responsible for posting it as a job.
-
Submit and Continue. A Submit and Continue button creates the requisition, sets its status as “Approved”, and takes you to the next step.
- Previous. Clicking the Previous button takes you back to the Select Template step. You lose any data you entered on the Requisition Detail form if you click Previous.
- Cancel. Clicking the Cancel button stops the requisition creation process. The wizard window closes, all entered data is lost and no requisition record is created.
- Save as Draft. The Save as Draft button saves all information entered so far, creates a new requisition record in the system, places it in a “Draft” status, and closes the wizard. You can re-open the requisition from the main Requisitions page and continue the process at any time.
-
-
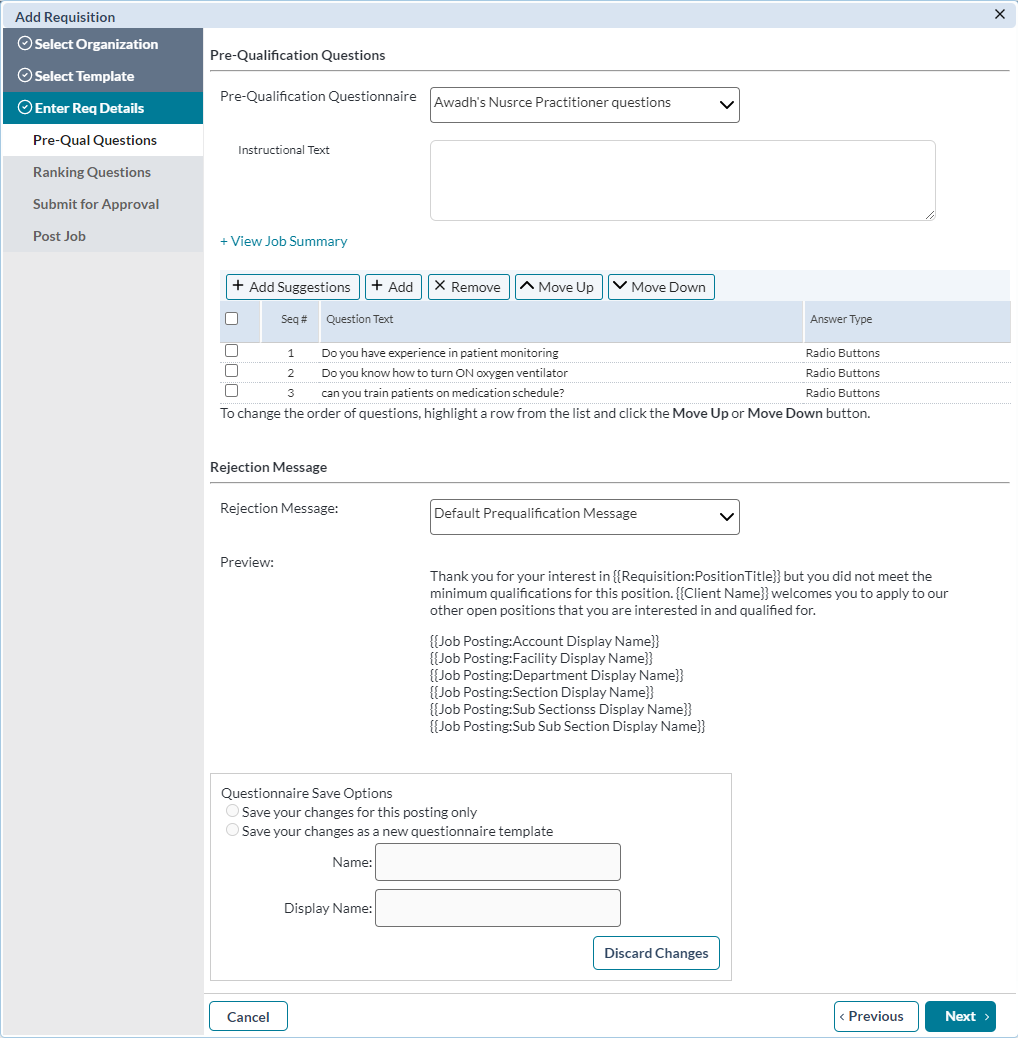
Pre-Qual Questions. This step allows the selection and editing of a pre-qualification questionnaire for the requisition. An existing questionnaire can be used, and edits can be made to the questionnaire if necessary.
 Pre-Qual Questions details
- Select a questionnaire from the Pre-Qual Questionnaire drop-down menu. The questions associated with the questionnaire are loaded into the table.
- Click Add Suggestions to add any recommended pre-qualification questions associated with fields contained in the requisition.
- Make any necessary edits to the questionnaire.
- In the Save Options section, select if you wish to save any changes made to the questionnaire to the selected questionnaire template, or if changes should only be applied to the current requisition.
- Click Next to advance to the next step of the process.
-
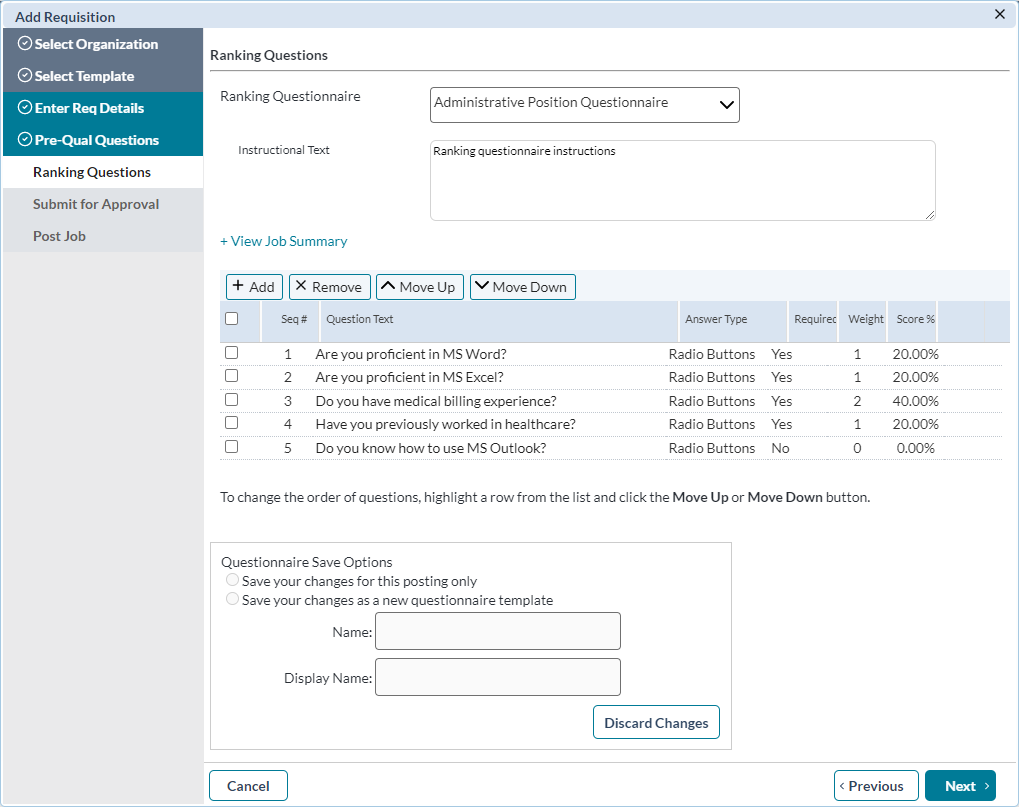
Ranking Questions. Similar to the previous step, this allows the inclusion and editing of a ranking questionnaire for the requisition.
 Ranking Questions details
- Select a questionnaire from the Ranking Questionnaire drop-down menu. The questions associated with the questionnaire are loaded into the table.
- Make any necessary edits to the questionnaire.
- In the Save Options section, select if you wish to save any changes made to the questionnaire to the selected questionnaire template, or if changes should only be applied to the current requisition.
- Click Next to advance to the next step of the process.
-
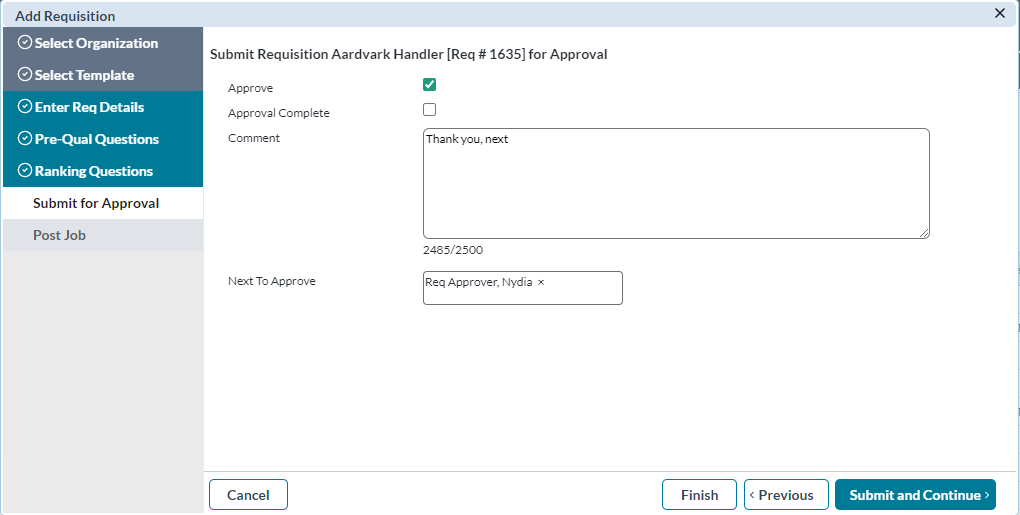
Submit for Approval (option). In this step, you determine who needs to review and approve the requisition before it can be posted to job boards.
 Submit for Approval details
Note: The Submit for Approval step only appears if your system is configured to use approvals; otherwise, you may be able to move directly to the Post Job step in the wizard.
- Check the Approve option if you wish to mark the requisition as approved.
-
Check the Approval Complete option if no other user needs to review the requisition before posting it as a job.
Note: The Approval Complete option is available only if you have the self approval permission.
- Type in any Comments regarding the requisition.
-
Determine which user needs to review the requisition in the Select Next to Approve field.
- Click the Search icon next to the field.
- From the User Lookup pop-up window, select the check box next to the name you want to assign to the Hiring Manager role for the requisition.
- Click the OK button.
- Previous, Cancel and Next
Just as with the previous step of the wizard (Enter Req Details), your system configuration determines which button is available to continue the process.
- Finish. If you see a Finish button, you do not have the ability to post the requisition as a job. Clicking Finish saves the requisition in a state of "In Process" and sends the requisition to the selected user for approval. Once it is approved by necessary users, it can be posted as a job by a user with the proper permissions.
- Next. A Next button means you have the necessary permissions to post the requisition as a job. Clicking Next takes you to the final step in the requisition creation wizard.
There are other options available if you wish to make changes to information you have entered to this point.
- Previous. Clicking the Previous button takes you back to the Enter Req Details step. You will lose any data you entered on the Submit for Approval step if you click Previous.
- Cancel. Clicking the Cancel button stops the requisition creation process. The wizard window closes and your requisition is saved to a "Draft" status. Any data entered on the Submit for Approval step is lost.
-
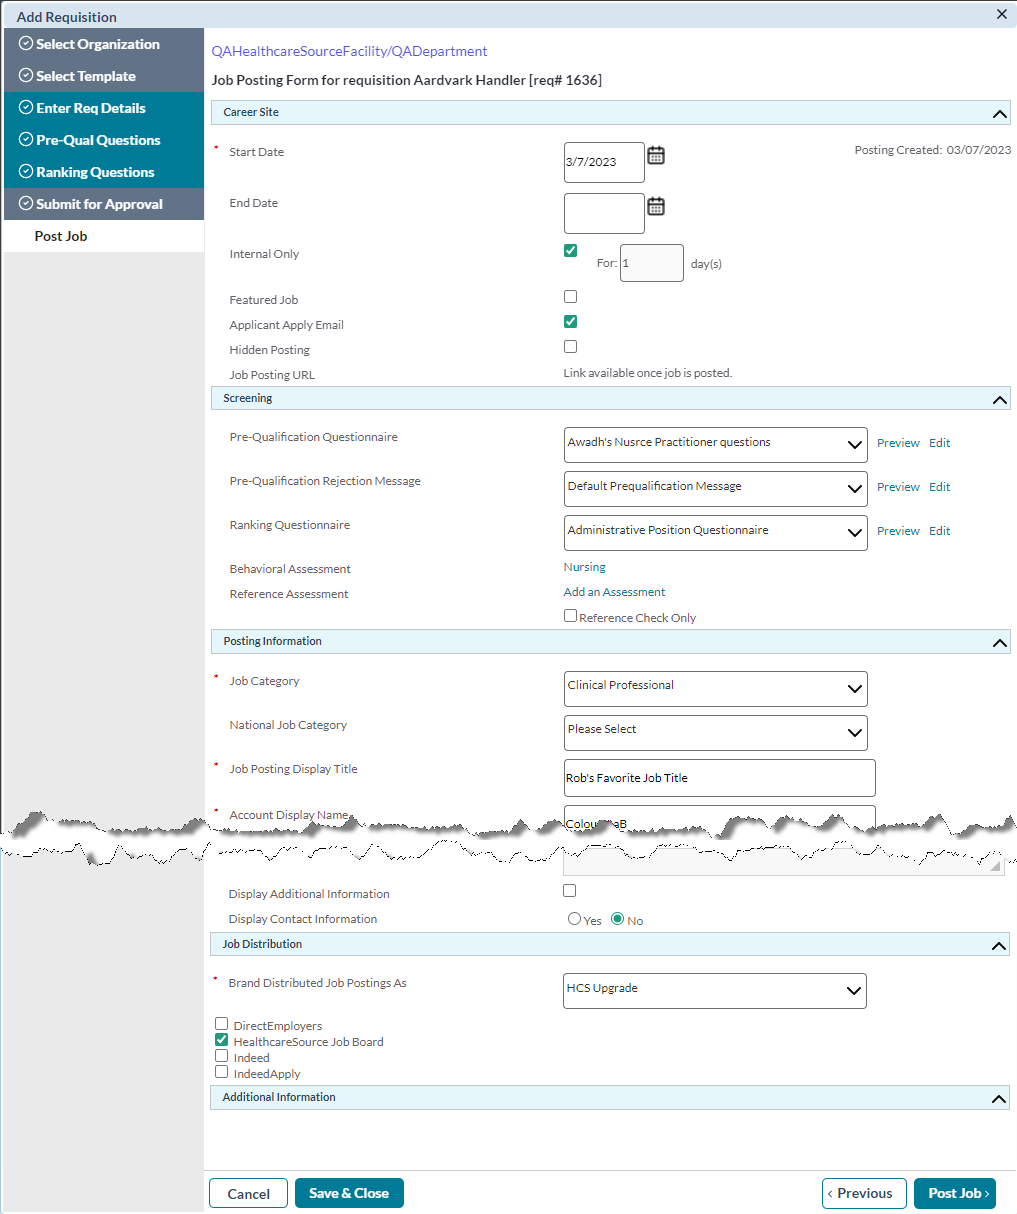
Post Job (option). The final step in the requisition creation workflow involves posting the job to available job boards. After this step, you can begin collecting applications.
