The Concept of Permissions
Permissions for users in symplr Recruiting are controlled through the use of User Roles. System permissions are assigned to roles, then users added to those roles. The added users inherit the permission set for that role.
Roles also help determine if users appear in certain selection lists for Recruiters and Hiring Managers.
Permissions are based on your organizational hierarchy, so it is recommended that you are familiar with this concept before continuing.
Expand the sections below in the order they appear to begin learning about User Roles and Permissions.
As mentioned, when a user is assigned to a role, they inherit the permission set defined for that role. When users are assigned to multiple roles with conflicting permission sets, the least restrictive set of permissions is applied.
There are several roles that are pre-defined in each symplr Recruiting installation. These can be edited to change the permissions, and they can be copied to create custom roles.
Pre-defined Roles
Every symplr Recruiting system includes pre-defined roles: Recruiter, Hiring Manager, Requisition Approver, Onboarding Router, General, and Administrator.
These roles come with a default set of permissions in the system, which can be customized to suit your organization's needs. The permission sets assigned to these roles was selected based on a historical analysis of how users typically interact with the symplr Recruiting system.
It is not necessary to use these pre-defined roles; they are simply provided as a starting point for setting permissions for users of your system.
For details on the default permissions assigned to each role, check out this topic.
Custom Roles
In addition to the pre-defined roles included with symplr Recruiting, you can also create custom roles for your system if you have the need for a specialized set of permissions for users.
Custom roles are created by either copying an existing role, or creating a new one from scratch.
Associated System Roles
All roles in the system are associated with a System Role. These system roles determine if users in a role appear in the necessary selection lists for recruiters and hiring managers.
Example: You create a new role and associate it with the Recruiter system role. Users assigned to your new role will appear in Recruiter lists - like when you select a recruiter for a new requisition, or sending comments on an applicant to a recruiter.
There are several system roles to choose from: Recruiter, Hiring Manager, Requisition Approver, Onboarding Router, General, and Administrator.
Every role in symplr Recruiting must be associated with a system role. When viewing the permission details for an existing role, you'll notice the page displays which system role it has been associated with. Also, when creating a new role, you are first asked which system role you want the new role to be associated with.
Before getting too deep into permissions, let's look at how everything is laid out.
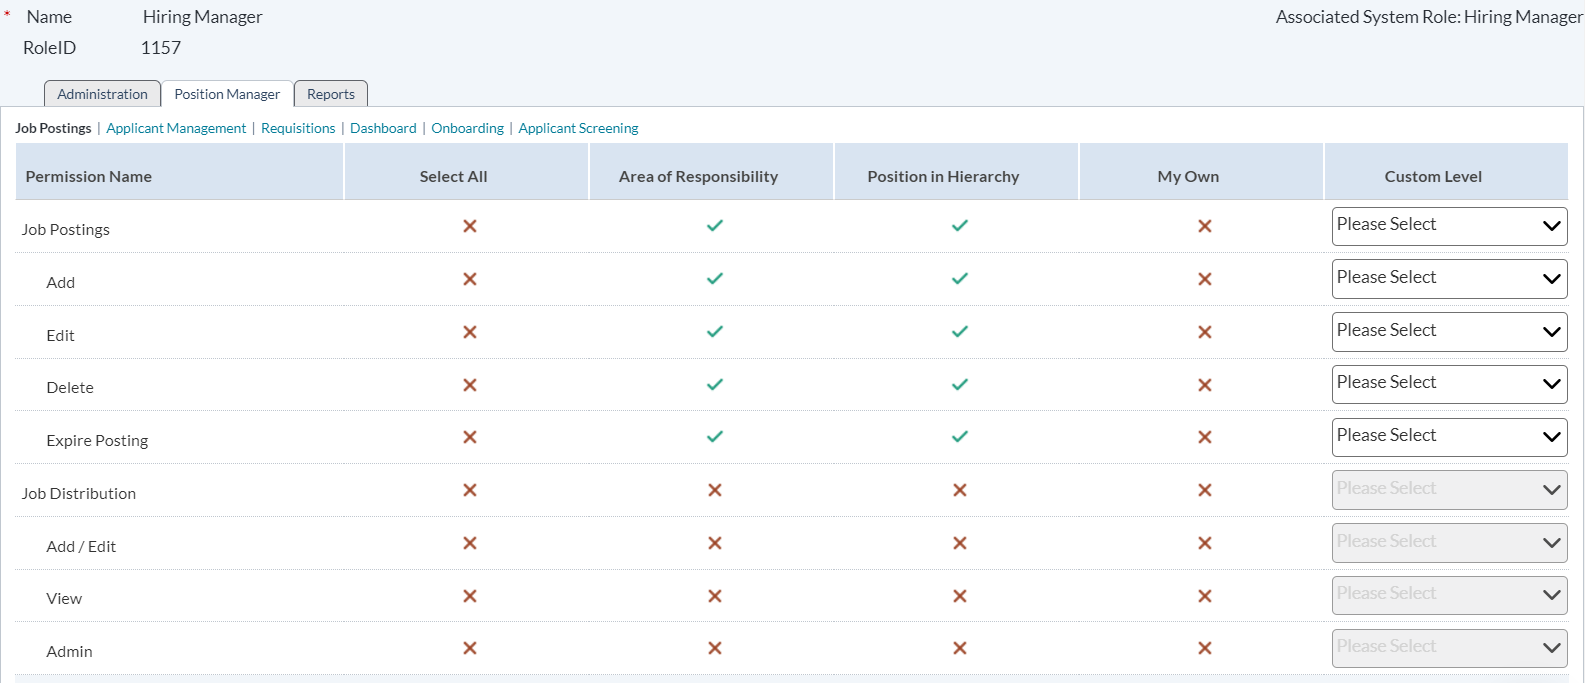
As you can see, this page provides three main tabs for permission sets in symplr Recruiting:
- Administration. The Administration tab controls permission sets for system areas that reside under the Admin tab (items such as Users, Questionnaires, Job and Communication Templates, etc.).
- symplr Recruiting. The symplr Recruiting tab controls permissions for the symplr Recruiting modules: Requisitions, Job Postings, Applicant Management, and Dashboard.
- Reports. The Reports tab controls permissions for viewing reports found on the Reports tab in symplr Recruiting. The items listed refer to report groups, not individual reports.
Each tab contains links above the permissions table that further breaks down permission sets for the selected area.
The permissions on each tab are broken down into a table on the page. The left side of the table (the first column, titled "Permission Name") lists all the available permissions for the site, grouped by area.
The first row of the table, the header row, displays the three ways to activate a permission:
- Area of Responsibility. Refers to additional areas the user has been assigned responsibility within the organizational structure.
- Position in Hierarchy. Refers to where a user resides in the organizational structure.
-
My Own. This option provides a way to assign permissions to users only if they are associated to a requisition/application in some way (such as a Recruiter or Hiring Manager); otherwise, they will not have access.
Note: The "My Own" column only appears when viewing permissions on the symplr Recruiting tab on the User Role Detail page.
- Custom Level. This allows you to override the "Area of Responsibility" and "Position In Hierarchy" columns and assign a different level of permission access to the role.
The “Permission Name” column shows the available permissions under the selected area. The “Select All” column simply provides a quick and easy way to activate or deactivate the entire row at once.
Finally, the main part of the table shows you if the permission has been granted or not. Quite simply, a green check means you have that permission; a red X means you do not.
Now that we have an understanding of how the permissions table is laid out, let’s look at how we would actually assign permissions to a role using the "Area of Responsibility" and "Position in Hierarchy" columns.
Position In Hierarchy
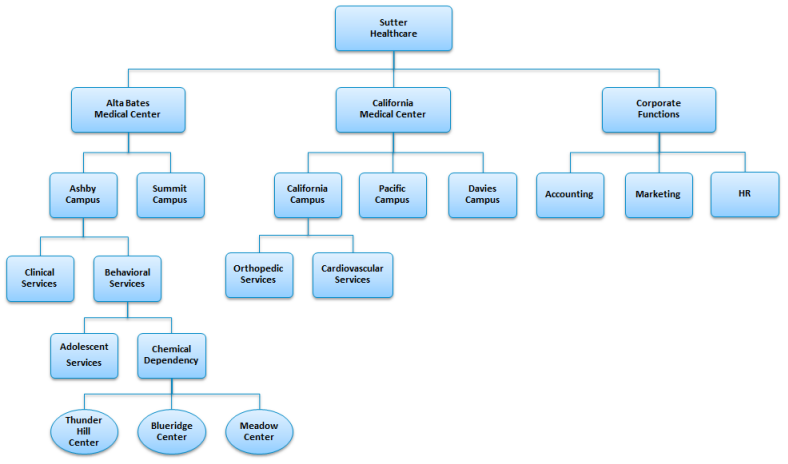
Since symplr Recruiting manages all types of sensitive data for your entire organization, it is necessary to ensure you are able to precisely control user access to that data across the system. The key to achieving this type of granular permission functionality is Position in Hierarchy (PIH), or where a user resides within the organization.
It may be helpful to picture a standard organizational chart with all of the different departments and sub-sections that branch off as you go down the structure.
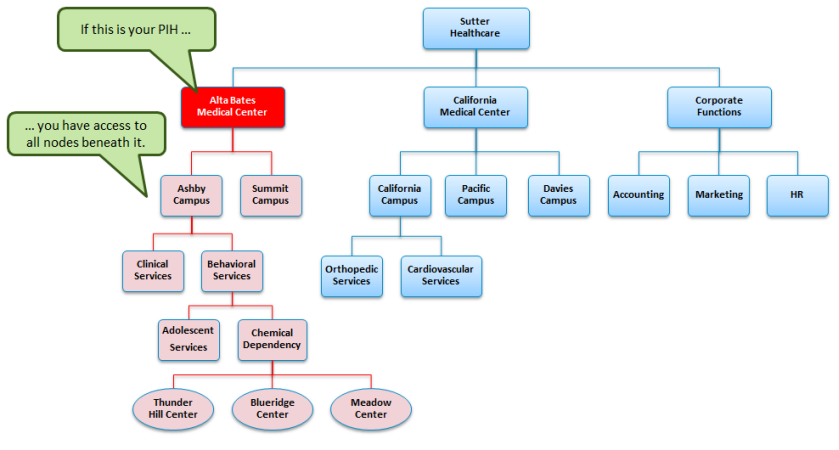
When a permission is activated in the PIH column, this means that a user is granted that permission for their position in the hierarchy, as well as everything below that position. So, you are granted that permission for everything up to and including the area you reside, but nothing above.
Area Of Responsibility
Area of Responsibility (AOR) is similar to PIH in that it refers to your organization’s hierarchy structure. When the AOR column is activated for a permission in the table, a user in that role is granted that permission for whichever Areas of Responsibility is selected in their user profile.
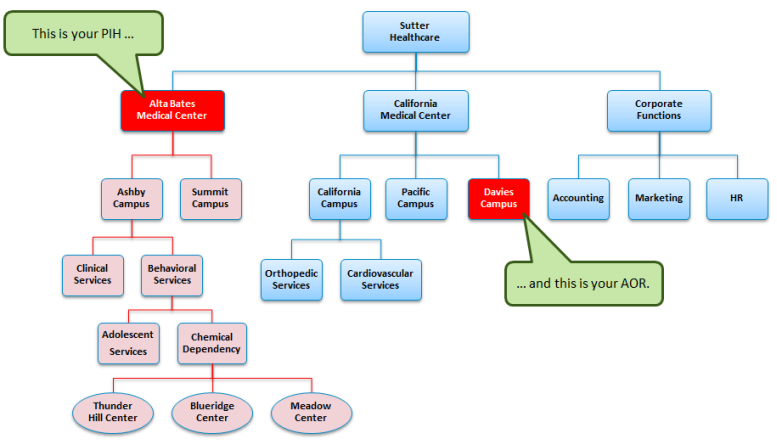
In contrast to PIH, where you also receive that permission for everything below you in the hierarchy, AOR grants you the privilege for the specific node indicated in your user profile’s Area of Responsibility only – it does not include areas beneath the indicated AOR.
So, in summary: PIH gives you permissions for your position plus everything beneath it, while AOR only gives permissions for the exact specified node in the structure – nothing above or below.
My Own
The “My Own” column provides a way for you to determine if a user should have a certain permission for everything within their Position in Hierarchy, or just those items they have been assigned to in some way (as a Recruiter or Hiring Manager, for example).
Under normal use, the “My Own” column would be activated only when the "PIH" column is not activated. This means that the user only has that permission for items they are assigned to, and cannot perform that action on other items even if it resides in their PIH.
Custom Level
Finally, we have the “Custom Level” column. The drop-down list in this column shows all the levels of your organizational hierarchy, and is used in special cases where you want to override the usual Position in Hierarchy for a role.
When you select an option from the Custom Level drop-down, it will take the place of the PIH option for that permission and grant the user rights up to the level indicated in the drop-down.
Example: A user resides at the Department level in their Position in Hierarchy, and has permissions to create requisitions up to that level. However, a system administrator selects the Global level from the Custom Level drop-down list for the role. Now that same user will have the ability to create a requisition at any level of the organization since the Custom Level selection overrides their Position in Hierarchy.
So, with the Custom Level option, you can assign permissions either above or below the level indicated by a user’s Position in Hierarchy.
Warning: Use caution when adjusting permissions for a user role as it may have adverse effects on user access to the system. Please consult an symplr Support representative for assistance in any activities relating to permissions and user roles!
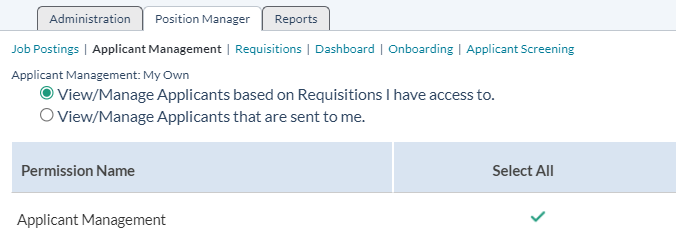
The Applicant Management link under the symplr Recruiting tab for a user role determines the actions a user can take on applicant they have access to.
But how do you determine which applicants a manager can access?
To answer this question, there are two options found above the permissions table for the Applicant Management area. These options determine if a manager can see all applicants that have applied to one of their requisitions, or if they only see those applicants the recruiter of the requisition specifically sends to them for review.
The options are defined as follows:
- View/Manage Applicants based on Requisitions I have access to. When this option is selected, managers are able to view all applicants that have applied to requisitions they have the ability to view. Managers do not have to be granted special access to an applicant in order to view their information; if they applied to one of their requisitions, the manager can view their application.
- View/Manage Applicants that are sent to me. This is the more restrictive of the two options. When this is selected, managers have access to applicants only when a recruiter sends the application for their review. Unless a recruiter specifically requests their review of an application (using the Send to Manager feature), the manager will not be able to view the applicant's information, even if that manager has access to the requisition.
Why choose one option over another? The quick answer is to speed up the applicant review process by limiting the number of applicants a manager has access to.
If a manager only sees applicants that a recruiter sends over, there are fewer applications they must go through to find a qualified candidate.
However, since some organizations want their managers to have full access to applicants, we've provided the ability for managers to view every applicant that submits their information to a requisition.
